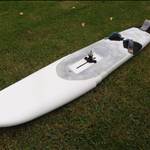
As Fangy's fins are so successful, I filleted my 21cm 55deg fin. It made a big difference, took all the wishy washy feeling out of it.
So now I'm going to try it on 'ken's delta, Ken isn't overly fond of this fin, so with any luck he'll notice an improvement.
If he doesn't we'll just grind it off again.
Just in case it works well, and all you disgruntled delta owners want to try something similar, I'm documenting the process.
So I don't have the embarrassment of a fin stuck in a board, I've made a jig to hold the fin while I glass the fillet on.
Some acrylic contact cemented to scrap chip board.
I've sanded the fin where the fillet's going and removed the rubber buffer from under the front overlap.
Cut some rovings to form the bulk of the fillet, some glass to go under and over.

More tomorrow after I've laid it up.
Brilliant thanks Mike, this is going to save me a lot of pestering you with emails :-)
Select to expand quotefangman said..
Brilliant thanks Mike, this is going to save me a lot of pestering you with emails :-)
Of course, and a few others I imagine.
I have one such fin and look forward to following the process.
Much appreciated decrepit.
Had roving problems today. I'm using some stuff that's really designed for chopper gun use, so it's very stiff, and some of mine has become kinked.
I also cut too much too long, so results aren't as good as they should be.
But Dot was kind enough to take pics while I was doing it, so I better post them hadn't I ?
Applying resin to the rovings with the stirrer stick, I sort of drizzle it on, that way you can control how much goes where.

Once there's enough resin on I use a squeegee to spread it out, by flattening it out you can work the resin evenly around

Next I wet out the underlying cloth

And place on the jig.

Then the fin goes in and rovings go on

Push them roughly into place with the squeegee, the add the wetted out top layers of cloth.

Then roll the wheelo over it to remove air bubbles and produce a nice curved shape.
Here's the wheelo I use for this, it's a bolt with holes drilled in each end, and a wire handle


So you can see this has ended up thicker and longer than it should be, also it was hard work forming the curve, the stiff kinked rovings kept pushing it out of shape.
The best rovings I've used came from a surf supply shop.
This is how we used to put fins on surfboards in the old days.
If you can't locate a surf supply shop that sells them any more, there are other alternatives.
 Top left is the chopper gun stuff I'm using. Don't bother with it, too much trouble.
Top right is what plasters use to fix plaster board to ceilings, but this is also a pain, it's too much of a tangle.
Bottom is woven rovings, this is great if you don't mind un-weaving it first.
Probably if you can't get plain old fashioned rovings, a stiff bog could take it's place, the same two layers of cloth over the top, and the wheelo should still work to create a nice curve, blending the bottom of the board onto the fin.
So now I have to wait a few hours for the resin to jell then I can cut away all that excess!
And speaking of resin, you could use almost anything here, as long as it's runny enough to wet out the cloth.
Is there any reason to want to use fibreglass on this? Does it need to be strong?
I'm half thinking that if you could replicate the fin inside a computer, then a 3D printed skirt would be enough to do a proof of concept test (you could even take the skirt off during the day if you wanted to really compare the feel). Then if others had the same fin it would be trivial to print more copies for them to try.
Select to expand quotenebbian said..
Is there any reason to want to use fibreglass on this? Does it need to be strong?
There needs to be a lot of pressure on the tip to stop weed getting underneath it.
And to make it easy to fit any board, the feeling is, we leave the fin a bit loose in the box, so the fin is located exactly by the fillet.
So a temporary fillet could be weak, but you'd probably have to clear the weed mustache every run.
Unless you started the fillet slightly behind the fin's leading edge, instead of in front of it like I have.
Resin has jelled and I've managed to trim the worst of the excess with a sharp curved knife.

It's still going to need a fair amount of sanding to get it to the shape I want, but that may have to wait until Wednesday, looks like wind tomorrow.
Looking good Mike, what i have found is when working with rovings and the wheel you need to let the resin gel a bit , then stick some bleeder film over resin and then you can move the rovings to where you want them with your wheel, you mite need to cut the film in some places and also some shorter roving lengths where there needed, Select to expand quotedecrepit said..
Resin has jelled and I've managed to trim the worst of the excess with a sharp curved knife.
It's still going to need a fair amount of sanding to get it to the shape I want, but that may have to wait until Wednesday, looks like wind tomorrow.
Select to expand quotedecrepit said..nebbian said..
Is there any reason to want to use fibreglass on this? Does it need to be strong?
There needs to be a lot of pressure on the tip to stop weed getting underneath it.
And to make it easy to fit any board, the feeling is, we leave the fin a bit loose in the box, so the fin is located exactly by the fillet.
So a temporary fillet could be weak, but you'd probably have to clear the weed mustache every run.
Unless you started the fillet slightly behind the fin's leading edge, instead of in front of it like I have.
What if you had the rubber pad under the front edge as part of the fillet?
screwing the fin down will then ensure a tight fit to the board!
Select to expand quotedecrepit said..
Resin has jelled and I've managed to trim the worst of the excess with a sharp curved knife.
It's still going to need a fair amount of sanding to get it to the shape I want, but that may have to wait until Wednesday, looks like wind tomorrow.
Is the fillet tapering down to almost nothing at the back of the fin or is it the same throughout the full length. If the latter are you going to have to modify the cut out at the back.
Select to expand quoteStretchy said..
What if you had the rubber pad under the front edge as part of the fillet?
screwing the fin down will then ensure a tight fit to the board!
That's what I'm doing Rob, but the fillet needs to be strong enough to take that pressure.
Select to expand quoteSwindy said.. Is the fillet tapering down to almost nothing at the back of the fin
Yep, once it's hard enough to sand, that's how it will end up.
The fillet will end at the back of the fin box. I don't want to fill in the gap under the overhang, in case it sucks air in.
Select to expand quotekeef said..
Looking good Mike, what i have found is when working with rovings and the wheel you need to let the resin gel a bit , then stick some bleeder film over resin and then you can move the rovings to where you want them with your wheel, you mite need to cut the film in some places and also some shorter roving lengths where there needed,
Thanks keith, using the layers of cloth over the rovings usually works the same, it's just that the stuff I'm using isn't normal rovings, it's for a chopper gun, so it's been glued together so it doesn't fall apart going into the gun. This makes it very stiff, and somehow it's got bad kinks in it as well. So I don't think bleeder film would work any better than cloth, in fact I think it would be harder to form a complex curve as cloth is a bit more conforming.
I know the rovings you are talking about ,normal rovings will do the same if they absorb water then dry out , i have found glass mat good to compress the rovings or chop but not good for moving the fibers to form a shape, im interested in these fillets so mite have a go
Pardon my ignorance but what's adding a fillet supposed to do? ![]()
I assume the fillet is the angle / shape where the fin meets the board? ![]()
Select to expand quotesboardcrazy said..
Pardon my ignorance but what's adding a fillet supposed to do? ![]()
I assume the fillet is the angle / shape where the fin meets the board? ![]()
You have given me a mighty challenge: to answer without waffling on for over a page. In the shortest possible terms. Yes, the fillet is the rounded bit at the junction between the board and fin. The fillet suppresses the formation of turbulence at the junction. (This turbulence is made up of a Horse-Shoe vortex and Secondary flows ). Turbulence is inefficient and wastes energy and may contribute to spin out. Adding in the fillet makes the fin more effective and less draggy for its size. Ta dah! did it in four lines ![]()
![]()
Select to expand quotefangman said..sboardcrazy said..
Pardon my ignorance but what's adding a fillet supposed to do? ![]()
I assume the fillet is the angle / shape where the fin meets the board? ![]()
You have given me a mighty challenge: to answer without waffling on for over a page. In the shortest possible terms. Yes, the fillet is the rounded bit at the junction between the board and fin. The fillet suppresses the formation of turbulence at the junction. (This turbulence is made up of a Horse-Shoe vortex and Secondary flows ). Turbulence is inefficient and wastes energy and may contribute to spin out. Adding in the fillet makes the fin more effective and less draggy for its size. Ta dah! did it in four lines ![]()
![]()
I presume it would also work on pointer and weed speed fins, enhancing lift, reducing drag and allowing a smaller than normal fin size for a particular board width / sail size combination?
Select to expand quoteJohn340 said..fangman said..sboardcrazy said..
Pardon my ignorance but what's adding a fillet supposed to do? ![]()
I assume the fillet is the angle / shape where the fin meets the board? ![]()
You have given me a mighty challenge: to answer without waffling on for over a page. In the shortest possible terms. Yes, the fillet is the rounded bit at the junction between the board and fin. The fillet suppresses the formation of turbulence at the junction. (This turbulence is made up of a Horse-Shoe vortex and Secondary flows ). Turbulence is inefficient and wastes energy and may contribute to spin out. Adding in the fillet makes the fin more effective and less draggy for its size. Ta dah! did it in four lines ![]()
![]()
I presume it would also work on pointer and weed speed fins, enhancing lift, reducing drag and allowing a smaller than normal fin size for a particular board width / sail size combination?
The jury is still out on rake/effectiveness, we've yet to try it.
But I suspect with pointers there won't be a noticeable difference.
The theory at the moment is that highly raked low aspect ratio fins, have a lot of flow coming off the board and running down the fin. Due to water running from the high pressure side to the low. When this flow across the board and down the fin meets the normal right angle junction, it creates a low pressure zone that creates cavitation/ventilation. Transforming the right angle to a flowing curve prevents this happening. Or so we think.
Pointers are designed to minimise downward flow, and the less rake and higher aspect a fin has, the less this flow should be.
Select to expand quoteJohn340 said..
I presume it would also work on pointer and weed speed fins, enhancing lift, reducing drag and allowing a smaller than normal fin size for a particular board width / sail size combination?
A lot of the turbine blades with endwall shaping ( fillet) that I looked at, had very little rake, so if you can extrapolate from turbine blades to fins, then yes it should be beneficial. But I haven't looked at that in any detail nor done any experimenting so I really don't know. The weed is so thick here atm, I am experimenting with the blades on my lawnmower instead ![]()
Select to expand quotenebbian said..
Is there any reason to want to use fibreglass on this? Does it need to be strong?
I'm half thinking that if you could replicate the fin inside a computer, then a 3D printed skirt would be enough to do a proof of concept test (you could even take the skirt off during the day if you wanted to really compare the feel). Then if others had the same fin it would be trivial to print more copies for them to try.
I've had another think about this Ben, and if the skirt was more like a shoe, so the fin fitted inside it, then the fin would be taking the compressive load not the skirt.
Select to expand quotedecrepit said..nebbian said..
Is there any reason to want to use fibreglass on this? Does it need to be strong?
I'm half thinking that if you could replicate the fin inside a computer, then a 3D printed skirt would be enough to do a proof of concept test (you could even take the skirt off during the day if you wanted to really compare the feel). Then if others had the same fin it would be trivial to print more copies for them to try.
I've had another think about this Ben, and if the skirt was more like a shoe, so the fin fitted inside it, then the fin would be taking the compressive load not the skirt.
That's what I was getting at Mike.
Select to expand quotefangman said..sboardcrazy said..
Pardon my ignorance but what's adding a fillet supposed to do? ![]()
I assume the fillet is the angle / shape where the fin meets the board? ![]()
You have given me a mighty challenge: to answer without waffling on for over a page. In the shortest possible terms. Yes, the fillet is the rounded bit at the junction between the board and fin. The fillet suppresses the formation of turbulence at the junction. (This turbulence is made up of a Horse-Shoe vortex and Secondary flows ). Turbulence is inefficient and wastes energy and may contribute to spin out. Adding in the fillet makes the fin more effective and less draggy for its size. Ta dah! did it in four lines ![]()
![]()
So Mr Fangster, your FF fin is intended not for top end, but low to mid end range. Do you think the fillet would benefit a low aspect fin intended for 40+kts?
Select to expand quoteStretchy said..
So Mr Fangster, your FF fin is intended not for top end, but low to mid end range. Do you think the fillet would benefit a low aspect fin intended for 40+kts?
It would seem logical Stretch, but I know next to nothing about low aspect and low rakes and not confident to make that connection.. The new FF 20cm will be an interesting test bed, I would think someone like you could push it up to around the 40, so you are hereby elected the test crash dummy. ![]()
Curious as why these work. The articles I found suggest little difference but clearly enough evidence is in to say that it does.
I am thinking that the right angle fin/board junction transitions create a discontinuity that triggers turbulence/cavitations.
I kind of like the fins I made. Nice to know that they can be made even better.
So your next marketing opportunity Fangy is to make plastic printed 'Fillet' 'shoes' for all of our current fins.
That should help to use up a bit of all that spare time you have... ![]()
![]()
Select to expand quotesailquik said..
So your next marketing opportunity Fangy is to make plastic printed 'Fillet' 'shoes' for all of our current fins.
That should help to use up a bit of all that spare time you have... ![]()
![]()
I am pretty sure Nebbian sits around all day waiting for opportunities like this. I will handball it to him. He will be chuffed to have something to do with his all free time ![]()
Select to expand quotewaricle said..
Decrepit, did you modify that Delta fin?
As I said we had wind yesterday, I'm going back in the shed after lunch, to sand it back to where I think the fillet should be. More pics a bit later.
unfortunately because I overcooked the amount of rovings, by the time I sanded it back, I'd gone through all the cloth leaving very rough rovings.

So next fillet job, I'll try just using bog and cloth.
No disaster though a layer of bog fixed it.

should just need another sand tomorrow and a layer of spray putty.
To sand the fillet, I used a piece of rear boom tubing and an old tendon to wrap sandpaper around.
to spread the bog I used a piece of 1mm kitchen plastic cutting board.