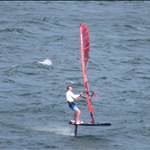
I was asked by a fellow Seabreeze'r to add some info on how I've modified my RS:Flight F4 Foil to end up with what you see in the first pic below; and yes that was also a JP 135. When I originally bought it the Starboard race foil was not available and I've been continually tinkering with it in order to keep it on pace with latest foils, which it seems to be, failing the big front wings most now have for light conditions. I'd also add that unless you have a fair bit of experience with this sort of stuff it's probably not worth entertaining these mods...cutting up a 2k+ carbon foil is not everyone's cup of tea

First step; Anyone who has raced a windfoil knows that fuselage length is your friend and front wing placement is important. Pryde/F4 jumped the gun on both these counts, while the overall wing profile design and shape is really good in standard form the fuselage is way too short and the front wing too far back. This has been discussed before in other threads and we can again later here if anyone is interested but for now, to the cutting.
I dealt with the rear fuselage first as it looked like the easiest thing to change. Initially I made a short 110mm extension and straight away it was better. I then went all in and added 300mm; skip to 1)

1) Out of some 10mm 316 S/S plate I water jet cut a profile with a front bayonet to go in the existing fuse and then the mirror on the rear end. It is drilled and tapped on the front end exactly as per the existing rear stabiliser bayonet.
I then 3D printed a large section of tube which matches the existing fuselage outer profile and slides over the S/S profile. I bevelled the edges with a grinder so I could keep some wall thickness in the corners where it is thin. 3D print material is PLA and solid fill as you need good compressive strength. See a few pics below.
1.1) S/S Profile and 3D printed tube.

1.2) 3D printed outer fitted to S/S, also note tapped holes as per standard rear stab

1.3) Rear where stabiliser will now fit.

2) Below you can see a few pics of how much has been added to the rear; existing position and new position.

2.1) Original rear stabiliser position.

3) Then I glued the 3D printed outer on with epoxy and fitted it to the fuselage. I used the bolts exactly as per how you'd fit the original fuselage. This lets you get the alignment perfect along the longitudinal axis as this is very important. I then gave it a bit of a sand to remove all the existing clear coat and filled over the bolts and the join etc, see below in 3.1)
3.1) New rear extension fitted.

4) Prepare the carbon: Over the fuselage I used 7 layers of 3K carbon sleeve; 4 off 25mm, 3 off 38mm. Then 5 layers each side and bottom of 80gsm Unidirectional carbon. The sleeve was progressively layered back from right at the mast to the tail, it is important to ensure you get a good amount right at the tail as that is a high stress point from the stab loading but you also want to keep it nice and streamlined.
The uni-di extended from just behind the join to just behind the front of the mast. This is important because we have just added a huge lever to the rear, the torsional moment around the mast is much larger. If you do not add this it's only a matter of time until whole rear end snaps off, probably right between the mast and the original end of the fuse. This is why you can't just bang a 300mm S/S extension in and happy days, it would just snap the fuse straight off.
Then it's just standard wet it out and vac bag. Vac bagging is important as it ensures very good cloth/resin ratios for maximum strength and minimal voids. Failing a vac bag you could probably spiral wrap it but the result won't be as good.
4.1) Carbon, peel ply, breather fabric, vac bag shown below.

4.2) Vac bagged

4.3) Vac bag removed, quick sand and microballoon fill any areas that need attention.

4.4) Bit more sanding and some high fill primer.

4.5) Lick of paint, done.

4.6) Compared to a starboard race foil, you can see the front wing position difference.

4.7) Bag no longer fits.

So I sailed it like this for quite a while and it was very successful. Much improved over the standard foil and particularly good in strong winds which made sense given the front wing position. I always new the front wing had to move but it was a much bigger job and irreversible if it didn't work out. I then finally sailed a starboard race foil on my board and rig combo and I knew straight away it had to be done. Queue phase 2:
5) Phase 2 is a little more out of reach of the 'home gamer' but you could still probably do it with a grinder, some skill and a bit of time. I'm lucky to have a lot of resources at my disposal so...CNC mill it is. Measured up the fuse and played around in CAD for a while till I was happy. Ended up moving the front wing forward 130mm, which is a lot given the relative amount of lift this wing provides. It's actually about 20mm further forward, relative to the mast, than the wing on a starboard race fuse. I have seen they have a new race fuse called the 'plus+' which I think may have moved their wing further forward too....but that's speculation on my part, it's not in the public domain yet really.
5.1) Pressed a few buttons, had a coffee, front wing adaptor machined.

5.2) Front of existing fuse sanded to match new 316 S/S plate

5.3) Mocked up

Now I didn't take any pics of this carbon process but basically I cut up strips of 200gms 3K carbon twill to completely fill up the void around the existing fuselage and the stainless steel plate and to form the basic shape of the nose; solid carbon no fill, vac bagged. I then sanded this all down to a rough nose shape. I then added 4 layers of 3K carbon sleeve over the whole lot and blended it back towards the mast, vac bagged. The front end is in standard form a lot stiffer than the rear and I could see the thickness with I cut the nose off so all good as far as I was concerned.
5.4) Carbon rough sanded and wing fit check.

5.5) Other side. note; went to a stub nose shape for simplicity and probably cleans up the flow under the wing...but I didn't CFD it so just eyeball calcs here.

5.6) High fill primer and paint as per the rear fuselage.

5.7) Finished product.
So how does it sail. Well basically like a starboard race hahah, although I think more powerful or front foot biased anyway as the front wing is further forward. It's much easier to sail in light conditions as the load between the feet is much more even. In light conditions with the original front wing position and long rear fuse you had to really work hard. It's more of a challenge downwind in breeze to keep it in the water but that's to be expected. Much more balanced trim when healed over upwind, no more nose drop. Super stable longitudinally now....although was already good with the 300mm rear extension. Overall top speed I think has probably dropped 1kt or so from the very original short fuse due to the added fuselage drag but the upwind/downwind VMG is night and day.
As I kind of alluded to at the beginning, this is a mod purely aimed at racing, although just the rear extension did make it a way way better every day foil. Anyone who's not crazy would just go and buy a starboard race or the new Pryde F4 race foil etc but as I said I've tinkered with this thing over time as I started racing.
Flame away

 CJW
> 9 months ago, 3 Jun 2019
CJW
> 9 months ago, 3 Jun 2019