Hello everyone,
I've been lurking for many years on the threads detailing Paul Day's Lake Lefroy Mini plans and other people's builds. I've wanted to build my own but never had the time, resources or skills to do it properly. This year I finally bit the bullet and took a stab at my own LLF Mini.
There was one big problem, which is that the stock available in the U.S. is in Imperial units, not Metric. If I wanted to build an LLF Mini, I'd have to modify the plans slightly to accomodate stock in inches instead of millimeters. The primary concern was being able to telescope certain parts into the main chassis spine so that it was collapseable. I decided to mock the LLF Mini in CAD and convert it to the nearest inch equivalent that way. It turned out that most of the structural members had close equivalents in inches, and the telescoping parts worked out on their own. (1/8"-thick walled tubes fit perfectly into their 1/4"-up cousins). I decided to use square tube instead of round for the spine because it would be easier to join with stronger joints to the rear struts and front steering fork. Of course my biggest concern with that was having enough torsional stiffness in that member to support the twisting of the sail on it. I did a quick torsion stress analysis to make sure the stock I chose had the same strength in torsion as the round tube in Paul's original plans.

This was my first welding project so please forgive the ugly welds. Here is a shot of where the spine attaches to the rear strut:

I left the little tabs that I bent out so that I could use them as additional welding points. It's overkill but with my poor welding skill I wanted to air on the safe side.
Here are photos of the finished rear part of the chassis, and the finished front fork:

All the telescoping joints use cottering pins to hold them in place.

With all the welding done, it was on to the seat. I just made the wooden version from Paul's plans. I nailed and glued the sides of the back into the bottom seat and then fiberglassed over those joints for extra strength. But I used 1/2" ply so I'm not as concerned about this joint's strength as with 3mm ply. The seat is bolted to the chassis in five places so it gets most of its strength from the underlying steel.

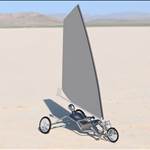
I made the boom quickly from an aluminum tube and a wooden rowlock I hacked out of some solid spruce. After modifying a windsurfing sail per Paul's instructions, I had a finished (yet to be painted) landyacht!

I am landlocked in Tennessee but there is an abandoned airfield nearby that is paved and has a 1-mile loop that I can sail on. I'll post here about that first sail! And if anyone is interested, I can draw up some modified plans in imperial units for those who are also in the U.S. and want to make an LLF Mini. Thanks for reading!
 brokenbits
> 9 months ago, 11 Nov 2024
brokenbits
> 9 months ago, 11 Nov 2024