Hi all. I posted the build of my timber SUP here a few years ago. Thought someone might be interested in seeing my latest attempt. I am using nomex carbon fibre composite panels and probably some cork over the rails. It will be hollow, no foam inside, just air. I'm using the same technique as when making hollow timber boards. I will post my progress over the next few months


Select to expand quotetarquin1 said..
Nice one. What are you going to use as the skin.
I'm going to skin the whole thing with the carbon fibre panels. I can bend them by making cuts in one side of the panels. I have some cork used for engine gaskets that I will use for the rails. I will still fibreglass over the top as well.
I am making a hollow 14 ft SUP at the moment out of panels. I was thinking the same thing. Make a cut with a router with a 45? V bit where I need the panel to bend.
I have laminated cork and UD flax in the past. It makes it stiffer and easier to work with.
I have just used a thin straight cutter as the inside of the panels is cardboard-like so flexes easily when the carbon layer is cut.

Some progress pics. Frame glued with 2 part epoxy mixed with a thickener. Probably need to take it easy with the glue as it all starts to add weight. Can still pick it up with one finger easily..so far.
will add some off cuts to reinforce the deck area. May not really need them but too late adding them after it's glassed. Also added the carry handle box. After glassing will cut out the area and slot the carry handle in.


Added some support to the deck area, also a support block for the vent which I will add after glassing.


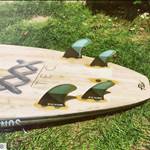
I'm hoping for the final weight to be under 10kgs, planning it to be about 8 ft 4 and about 30in wide. Will do 5 fcs fins.
Looking the goods so far. ![]() A project I wouldn't mind doing one day if I had the time.
A project I wouldn't mind doing one day if I had the time.
Are you a carpenter by trade? They usually dont have a problem with projects like these. And have the tools needed.
No I'm not a tradesman of any kind, just like building things. I've built these timber boards prior to this attempt.

Great work andypoz ![]()
I can understand your comment not to use too much epoxy to glue compared to ply.
Please keep posting progress ![]()
Decided to see the current weight. It's currently 3.9 kgs or 8.6 pounds. Might meet the target of under 10kgs or 22 pounds, I expect the glassing will add a fair bit.

Decided a bit more rocker is needed and will achieve this with some pressure when glueing the bottom skin. There is still an inch or two flex in the frame.
Also I've managed a double concave in the tail and a single concave in the nose. You can never have too many clamps, bricks and unused weights.
Select to expand quoteSunnyBouy said..
Looks ace...
But I think the bricks and weights will slow it down in the surf...![]()
Thanks.
No guarantee that it will float without the bricks and weights.
Added a couple more panels to the sides, trying to keep the same concave, also a small panel to the tail as the panel in the centre wasn't long enough. Progress has slowed due to holidays coming up and need to clear my back deck for Xmas stuff, it's so inconvenient.
Have been slowly adding strips to make the rails. Have added wood powder to the epoxy to thicken it hence the colour. Will then sand it back and add more epoxy until it's smooth and the correct shape I want.
I have completed a layer of carbon strips. It does look terrible at the moment due to the thickened epoxy. Need to sand it all back now and hopefully it will be close to the shape I want. Then I will use some glass cloth 4 oz and cover the rails.


Start with a quick 40 grit and will clean up then 80grit and rails will start looking good.
Not to much to go, can't wait to see it finished ![]()
I think I will need to start with a belt sander first, there's a lot of excess epoxy on there.
Select to expand quoteandypoz said..
I think I will need to start with a belt sander first, there's a lot of excess epoxy on there.
Wear a very good mask and join a vacuum to your sanding. Take very care of the dust.