[
im
g]
[
img]
Hi
Everyone. I just finished the longest Class 5 Yott build in Seabreeze history and I have a design flaw that needs fixing. I used an idea that originally concieved by Hiko i believed that was just an idea and i knew was never build and tested to myknowlege that gave me all the camber and toe adjustment that i was looking for so i built my version of them and found them not grip enough and kept moving out of adjustment. I think now i will just rebuild them to a welded fixed axle, as close to alignment and camber as i desire and elinimate all the moving parts. (K.I.S.S.) design . advise i often prech but dont follow myself. Not that the design isnt a great idea, it just didnt work in my case. So what im asking is if you have any pictures of rear axles that are rock solid for a Y frame yacht could you post me a pic or drawning so i can get some ideas for my replacments.
Here are a few ideas for adjustable camber. I use the 2 bolts welded together at 8 degree angle works well very easy to align.
This is from a Libre Kite buggy
These are the ones I use
These are from Popeye the welder (kite buggies)
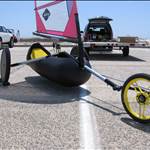
I have one set of 27" x 2" big wheels and a set of Barrows which I interchange between my kite buggy and class 5.
The rear axle in the buggy is straight so on that the camber is fixed at 8 deg but because I can rotate the axle section on the class 5 the camber angle is infinitely variable.
Can post more detail pix if needed.
I do not have any ideas to add but I am in the process of my first build and I like the simplicity of the first two pictures in this thread.
Hi everyone
I have just caught up with this thread The drawing on this thread is mine and is an idea that I came up with to allow both
adjustment of toe in and out as well as camber
My existing yacht has the inboard adjustment for toe in and works fine and has never moved out of adjustment and indeed is a common method here
but it actually adjusts toe in and camber at the same time
My idea was to expand on the same arrangement to allow camber to be adjusted separately
I am a bit surprised that it has been tried and has not worked I cant imagine why this is so
Note the drawing calls for slotted holes in the tube and is not just relying on the ends of the bolts for clamping effect