Inspired by Clem' s Skimini rebuild,I have decided to have a crack at building one.In the finest tradition of home builds,my aim is to use whatever I have to hand or can scrounge or buy as a last resort.Once I work out to upload photos I'll post my progress as I go.The raw materials I have gathered to date includie the mast and boom from windsurfer I got very chealy on Trademe, I hope to harvest some useful bits from a couple of mountain bikes which have been hanging around for years.My work bench is a picnic table.I have called my version a Skiwi
Tryhard be warned this can be very very addictive but you sound like just the right sort of guy to extract maximum enjoyment from it
Good luck with the build lots of support on this forum from guys who have been there done that What part of NZ are you in?
There's a point in dreaming ,following other people's adventures, that you come to where you say to yourself -I can do this.Yes ,I will probably be addicted to serial rebuilds like the rest of you.I will end up trying to make a machine that goes faster handles smoother and looks cooler.Guilty as charged.Were it not for forums like this I would not have discovered the truly amazing world of land sailing and been seduced.
The bikes had literally hanging around for years. I cut up the black one with an angle grinder fitted with a metal cutting blade quicker than a hacksaw.The front forks will be used for the front wheel and I hope to use some of the tubing and other parts for the build as well.

My first mistake was to throw away the short section from the bike's steering assembly.I could have cut this down and recycled the bearings.Instead I'll go for a bush insert.The lesson is -don't throw anything away

Here is the mast and boom I bought on Trademe for $50. I'll probably go for a straight section boom so I won't use this one. I hope to employ it elsewhere in the build if I can.The mast has a kind of rupture near the fat end which I'll look at repairing maybe by welding a section in.

I'm in Dunedin whose Scottish forebears would heartily approve of my desire to save money
While hunting around my house for materials I found some tube which will do for the spine and I also found the bits I thought I had thrown away.

The next job was to cut down the bike fork.This job was done in my shed which is a tad cramped which is why I usually use the picnic table.I used the angle grinder with the metal cut off wheel

I call this bit the steering head.I ground down the remaining bits after cutting the tubes off.I plan to recycle this part

Here is a birds eye view of a "dry fit".I think I will employ a different set up to the one Clem used.My current plan is to cut/grind a hollow in the top end of the fork to accommodate the steering head which will welded in place at 35 degree angle


Now here's my question:The bearing shells seem to be pressed onto the steering head not welded.Can I prise them off? If so how? My plan is to cut the steering head tube in half and weld that bit to the forks
I think they are pressed in like you say and can be removed with a hammer and drift of the appropriate size
Run over it with a hot air gun and they fall out usually.
Really enjoying your build. Great photos and construction.![]()
![]()
Take a long drift, as Hiko mentioned, put it inside the tube, and tap out the bearing races that way.![]()
The old hands to the rescue.Thanks chaps.By the way,are there any chapesses on this forum? Maybe only blokes are willing to risk sandblasting their soft parts.My wife doesn't like sailing because it is too slow. She is generally tolerant of my projects except when I built a boat inside our house, but she has expressed keen interest in this project.
The application of my hot air gun and focussed violence reduced the steering head to its component parts.I'll now figure out how to build a bearing based steering pin.

I found this part as I was pondering what do about the steering head.It was left over from a boat trailer kit I bought several years ago and I couldn't work out where it was supposed to go so I left it off

So I cut off the back bit using my trusty but ever so dangerous angle grinder and ground down the stumps.I'm still working out how best to attach it to the forks.The photo shows another dry fit.Clem's version appears to have the equivalent bit welded onto the underside of the head of the forks.


Love the expression "Focussed Violence" We tend to call it "Beating the S... out of it" Has the same end result and that is the objective. Enjoying you build and the humour which goes with it, keep the great photos coming....wok
Today I cut down the original steering head assembly to reconstruct a shorter version. I chickened out of using my angle grinder and used a hacksaw instead

The handsome vice which can seen in the previous photo is one of those zyliss clones which I bought at a home show several years ago.The demonstrator hypnotised me with his dazzling display of tricks and before I knew it,he had sold me one.As I walked back to my car, I had that slightly sickening feeling which coincided with the "I don't know that I should have done that " feeling. By the time I got home, I did the honourable thing-I hid the gadget in my shed. All was well until the credit card statement arrived and my wife had to be given an explanation.Those demonstrators are so good they should be promoted to Minister of Overseas Trade."I always wanted one these " said I ,which is not an completely true statement .
I digress.The bearings and races were washed in solvent and here they are in their glory
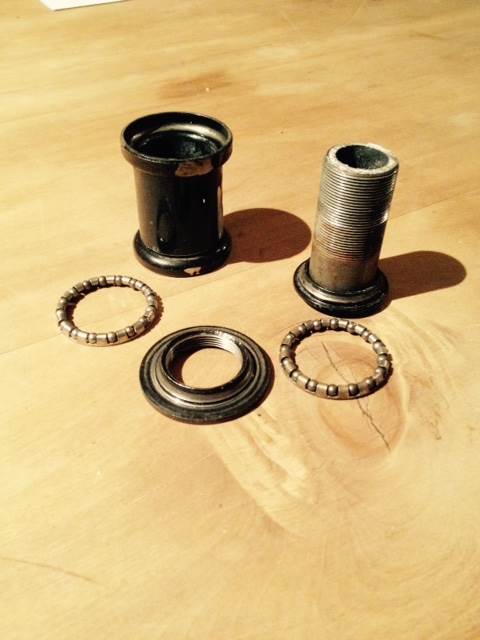
And tried anther dry fit.The next job will be to shape the underside of the fork head ready for this part to be welded onto it.

I decided to go with Clem's design and cut and ground the fork end to make the bearing frame fit